[Lesson 17]<<[Table of Contents]>>[Lesson 19]
The range is one of the most important and most commonly used Excel 2010 VBA objects. In fact, we have dealt with the Range object in previous lessons.
18.1 The Select Method
The Range object contains two arguments that specify a selected area on the spreadsheet. The syntax is
Range(starting_cell,Ending_ Cell)
For example, to select the range from cell A1 to C6, the syntax is
Range(“A1:C6″).Select
where select is a method of the Range object.
Example 18.1
Private Sub CommandButton1_Click()
 Range(“A1:C6″).Select
End Sub
18.2 The Columns Property
The columns property of the Range object is to select certain columns in the particular range specified by the Range object.
The syntax is
Range(starting_cell,Ending_ Cell).Columns(i).Select
Example 18.2
This example select column C in the range A1 to C6
Private Sub CommandButton2_Click()
 Range(“A1:C6″).Columns(3).Select
End Sub
You can also use Cells(1,1) to Cells(6,3) instead of A1:C6, the syntax is
Range(Cells(1,1),Cells(6,3)).Columns(3).Select
The output is as shown in Figure 18.1
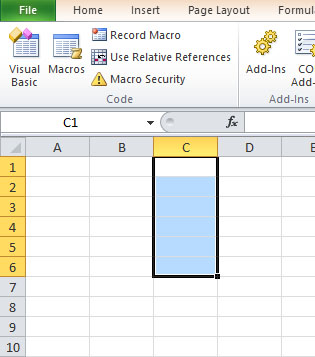
Figure 18.1
18.3 Using With Range……End With
You can also format font the cells in a particular column in terms of type, color, bold, italic, underlined and size using the With Range…..End With Structure. It can also be used to format other Range properties like the background color. Using With Range….End With structure can save time and make the code cleaner.
Example 18.3
Private Sub CommandButton1_Click()
With Range(“A1:C6″).Columns(2)
.Font.ColorIndex = 3
.Font.Bold = True
.Font.Italic = True
.Font.Underline = True
.Font.Name = “Times New Roman”
.Font.Size = 14
.Interior.Color = RGB(255, 255, 0)
End With
End Sub
* Without using With Range….End With, you need to write every line in full, like this
Range(“A1:C6″).Columns(2).Font.ColorIndex = 3
The output:
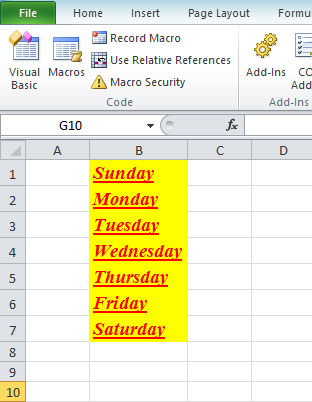
Figure 18.2
18.4 The Rows Property
Basically, the syntax for the Rows property is similar to that of the Columns property, you just need to replace Columns with rows.
The syntax of selecting a row within a certain range is
Range(starting_cell,Ending_ Cell).Rows(i).Select
Example 18.4
This following code selects the third row within the range A1 to F3
Private Sub CommandButton2_Click()
 Range(“A1:F3″).Rows(3).Select
End Sub

Figure 18.3
Example 18.5: Using With Range…End With for Rows
Private Sub CommandButton1_Click()
With Range(“A1:F3″).Rows(2)
.Font.ColorIndex = 3
.Font.Bold = True
.Font.Italic = True
.Font.Underline = True
.Font.Name = “Times New Roman”
.Font.Size = 14
.Interior.Color = RGB(255, 255, 0)
End With
End Sub
The Output

Figure 18.4
18.5 Using the Set keyword to Declare Range
We can write Excel 2010 VBA code that can specify a certain range of cells using the Set keyword and then perform certain tasks according to a set of conditions.
In Example 18.6, we shall write the ExcelVBA code such that it can accept range input from the user and then change the mark to blue if it is more than or equal to 50 and change it to red if the mark is less than 50.
Example 18.6
Private Sub CommandButton1_Click()
Dim rng, cell As Range, selectedRng As String
 selectedRng = InputBox(“Enter your range”)
 Set rng = Range(selectedRng)
For Each cell In rng
 If cell.Value >= 50 Then
  cell.Font.ColorIndex = 5
 Else
  cell.Font.ColorIndex = 3
 End If
Next cell
End Sub
Explanation:
The InputBox function is used to accept value from the users.
rng and cell are declared as a Range variable using the Dim statement while selectedRng is declared as a string that receives input from the user.
Once the input is obtained from the user, it is stored using the Set method and the Range function.
For Each cell In rng ……Net cell is a loop that can iterate through the selected range, one cell at a time.
The If…Then…Else statements are to specify the color of the font according to the range of values determined by the conditions.
The Output
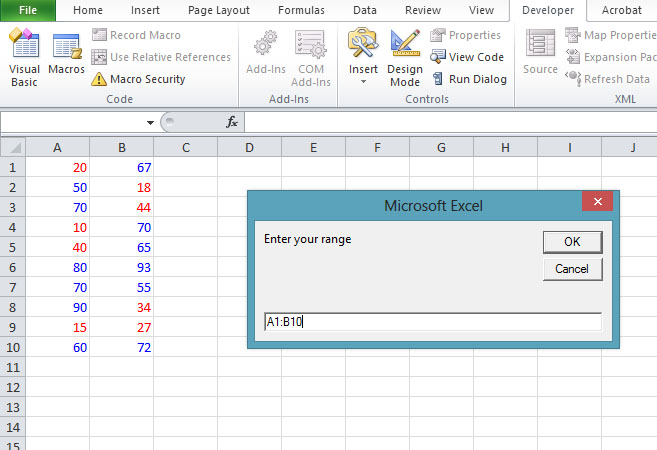
Figure 18.5
18.6 The Formula property
You can use the Formula property of the Range object to write your own customized formula.
Example 18.7
Private Sub CommandButton1_Click()
 Range(“A1:B3″).Columns(3).Formula = “=A1+B1″
End Sub
In this example, the formula A1+B1 will be copied down column 3 (column C) from cell C1 to cell C3. The program automatically sums up the corresponding values down column A and column B and displays the results in column C, as shown in Figure 18.6

Figure 18.6
The above example can also be rewritten and produces the same result as below:
Range(“A1:B3″).Columns(3).Formula = “=Sum(A1:B1)”
There are many formulas in Excel VBA which we can use to simplify and speed up complex calculations. The formulas are categorized into Financial, Mathematical, Statistical, Date , Time and others. For example, in the statistical category, we have Average (Mean), Mode and Median
Example 18.8
In this example, the program computes the average of the corresponding values in column A and column B and displays the results in column C. For example, the mean of values in cell A1 and Cell B1 is computed and displayed in Cell C1. Subsequent means are automatically copied down Column C until cell C3.
Private Sub CommandButton1_Click()
 Range(“A1:B3″).Columns(3).Formula = “=Average(A1:B1)”
End Sub
Example 18.9: Mode
In this example, the program computes the mode for every row in the range A1:E4 and displays them in column F. It also makes the font bold and red in color, as shown in Figure 15.6.
Private Sub CommandButton1_Click()
 Range(“A1:E4″).Columns(6).Formula = “=Mode(A1:E1)”
 Range(“A1:E4″).Columns(6).Font.Bold = True
 Range(“A1:E4″).Columns(6).Font.ColorIndex = 3
End Sub
The Output

Figure 18.7


